
Avoid Star trails
How to
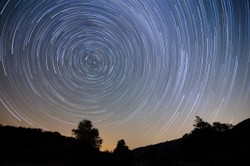
Star Trails, what are they, how can I avoid them (if you don't want them)
Firstly, you need to calculate the maximum exposure time before star trails become noticeable. Consider these few factors:
The Focal Length: The longer the focal length of your lens or telescope, the more apparent the star trails will be in a given exposure time. Longer focal lengths magnify the apparent movement of stars.
Sensor Size: The size of your camera's sensor also affects the visibility of star trails. Larger sensors may allow for longer exposure times before trails become noticeable compared to smaller sensors.
Aperture: A wider aperture lets in more light, allowing for shorter exposure times. However, extremely wide apertures might introduce optical issues like coma or vignetting, impacting image quality.
A rough rule of thumb for full-frame cameras is the "500 Rule" or "600 Rule," which provides an estimate of the maximum exposure time before star trails become noticeable:
500 Rule (for full-frame cameras): Divide 500 by the focal length of your lens. This gives you the maximum exposure time in seconds before trails begin to appear. For example, with a 50mm lens: 500 / 50 = 10 seconds.
600 Rule (for APS-C crop sensors): Since crop sensors have a smaller field of view, use the 600 Rule for them. Divide 600 by the focal length to get the maximum exposure time. For a 50mm lens on an APS-C camera: 600 / 50 = 12 seconds.
Remember, these rules provide a rough estimate and are not absolute. Some astro-photographers might use a more conservative rule, such as the "Rule of 400" or adjust based on their equipment and desired image quality. Additionally, advancements in camera technology, especially those with image stabilization or tracking mounts, can allow for longer exposures without noticeable trails. Experimenting and adjusting based on your specific setup and desired outcome is key.
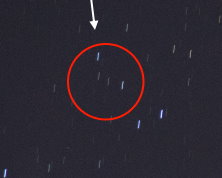
Star trails occur in astro-photography when the camera captures the apparent movement of stars across the sky due to the Earth's rotation. These trails appear as streaks or arcs instead of sharp points of light. While star trails can be a creative effect, for certain types of astrophotography where sharp star images are desired, preventing them is crucial.
Here are ways to prevent star trails.
Use an Equatorial Mount or Tracking Mount: Employing an equatorial mount that compensates for the Earth's rotation is one of the best ways to prevent star trails. By tracking the motion of the stars, these mounts allow your camera or telescope to move in sync with the apparent movement of celestial objects, keeping them fixed in your frame.
Shorter Exposure Times: Limiting the exposure time can also reduce or eliminate star trails. Shorter exposures capture less apparent movement of the stars during the shot, resulting in sharper images. However, this might require higher ISO settings or wider apertures to compensate for the reduced light gathering.
Wider Aperture and Higher ISO: Using a wider aperture allows more light to reach the camera sensor, enabling shorter exposure times. Similarly, increasing the ISO sensitivity can help capture more light in a shorter time, reducing the appearance of star trails.
Stacking Multiple Exposures: Taking multiple shorter exposures and stacking them during post-processing can effectively reduce or eliminate star trails. Dedicated software aligns and combines these images, effectively creating a single image with sharp stars.
Image Stabilisation and Tripods: Ensure your camera or telescope is firmly mounted on a stable tripod or mount. Even with shorter exposures, any movement or vibration during the exposure can cause blurring or elongation of stars.
Each method has its advantages and limitations, and the best approach often depends on the specific equipment you have and the type of astro-photography you're aiming for.
We Astro-photographers often experiment with a combination of these techniques to achieve the desired results.