
Exercise 1
How to
Taking a Nightscape Photo
Sometimes I drive through an area and think that would be a great foreground for a night sky photo.
I have found interesting trees, cattle yards, old vehicles and more. Later I go back and try to get a shot or mark it on Google Maps for the next time I am out that way.
I usually want the Milky Way in the photo but that is not always possible. Other times I am on site and the foreground I thought may be good actually isn't.
In these cases I may light up the foreground area for a second or two during the shot to highlight the foreground better. I have also had friends stand still whilst holding a torch up at the sky (interesting affect).
Night sky photography and particularly deep sky objects is all about collecting light.
For a landscape, the widest lens (focal length and aperture), longer shutter speed and high ISO carefully balanced will give you more light, more stars.
The trick is to work out the balance.
I use the 500 rule to work out your shutter speed, then to make sure you are not getting star trails, about half it to start with.
Example: an 18mm lens with my Nikon D500 (APS) crop sensor works out at 18.5 seconds (18 x the crop factor which is 1.5, divided into 500 =18.5 seconds).
Now sometimes 18 seconds will work, but most of the time it won't so I adjust to 10 seconds for this lens guarantee results.
IS0- I adjust to between 1600 and 3200.
So the shot for this camera with the 18-55mm lens (at 18mm) f/3.4, 10 Second exposure, ISO 3200. This should give fair results, if it is too grainy (noisy) you may need to lower your ISO. You could increase your shutter speed a little and leave ISO at 3200.
Take another shot, if you have star trailing, then revert back to the original shutter speed and decrease ISO.
If the shot has no star trailing but still grainy, reduce ISO.
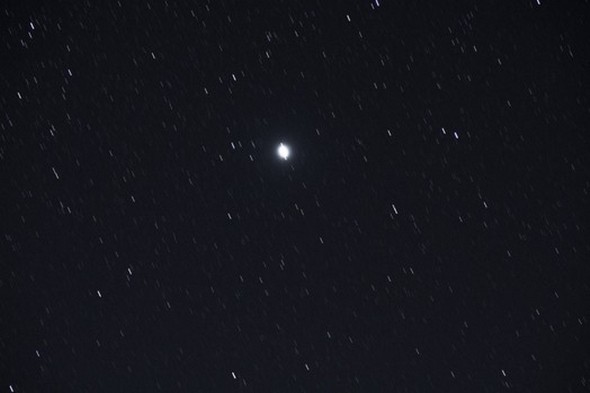
Exposure was too long- above photo has star trailing (stars start looking like sausages!)
A wider lens like a 10mm which will certainly allow for a 20 second exposure with similar settings, or you use an equatorial mount. If you already understand photography, this may be your next step to some longer exposures, and perhaps a title for another chapter.
* 500 ÷ Equivalent Focal Length. So, if your full-frame equivalent focal length is 20mm, the 500 rule would suggest that you use a shutter speed of 500 ÷ 20 = 25 seconds.
If you have a crop sensor (AP-S) you have to allow for the crop factor of 1.5 for Nikon or 1.6 for Canon. I.e. 500 ÷ crop factor focal length (20 mm * 1.5) = 16.6 seconds for the same 20mm lens.
EXERCISE 1
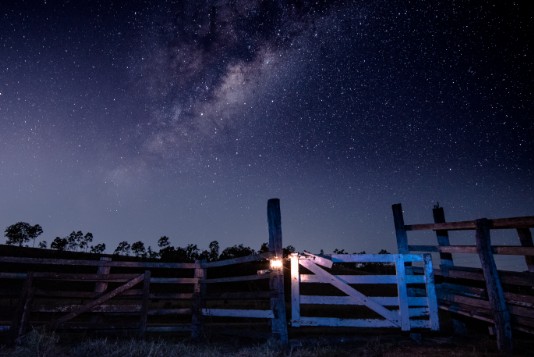
Capturing a Nightscape
The lighting for this photo does not have to be as dark as a deep sky object (DSO) or star trail. Infact, the moon may help light up the foreground for you.
Set you camera up on the tripod and frame the shot, ensure you are in manual mode, and manually focus the foreground,
Depending on how much light you have and how clear the sky is, try ISO 1600 to begin with and take a 15 second exposure.
1) Place your camera on a tripod with your wide angle lens attached.
2) Turn ‘Autofocus' off, and manually focus your foreground (if you have one)
3) Select Manual mode.
4) Plug in shutter release (or set the cameras timer to 10 seconds)
5) Set exposure to 15 seconds
6) ISO 1600
7) Set the f/stop smallest number it can go f/2.8 for example (the smaller the number the more light is let in)
8) Take the shot!
See what the shot looks like and make further adjustments as required.
Perhaps take a longer exposure in the next shot, followed by one with a smaller or bigger ISO and see what they look like.